Introduction
This is a document of steps for installing Aamks on an Ubuntu Linux-based host network.
About Aamks (from https://aamks.szach.in/?node=about):
“Aamks is an open source, web-based platform for assessing the fire safety of humans in buildings. Aamks runs hundreds of fire simulations (CFAST) and evacuation simulations (Aamks.Evac) and then evaluates the results. In each simulation humans are moving across the building and are affected by fire and smoke.”
Aamks is still under development and updates may result in the procedures described in this document to no longer produce a functioning Aamks installation.
Prerequisites
Before beginning the Aamks installation, there are some prerequisites.
Linux hosts
Aamks requires at minimum two Ubuntu Server -based hosts: one host running the web-based GUI (henceforth referred to as server) and one host running the simulation (henceforth referred to as worker node). The worker node must be running Ubuntu 18.04 or newer. A fresh installation of Ubuntu on both the server and workers is preferable; make sure to install OpenSSH on all.
The hosts should be connected to the same local network.
Aamks uses the Python bindings for the RVO2 framework; the rvo2.so library which is packaged with the GitHub repository of Aamks works only with Python 3.6. A surefire way of having Python 3.6 is to make a fresh installation of Ubuntu Server 18.04 on your hosts. If your Python version is newer than 3.6, you will either have to rebuild the rvo2.so library and replace the one that comes with the repository (for more information on that, see https://github.com/sybrenstuvel/Python-RVO2), or you can install Python 3.6 alongside the newer version (see Troubleshooting section for installation instructions).
Aamks requires a number of environment variables and aliases for successful operation on both the server and the worker node. To add these, use your preferred text editor:
$ vim ~/.bashrc
and add the following:
#Aamks exports and env variables
# aamks {{{
export AAMKS_PATH=’/usr/local/aamks’
export AAMKS_PG_PASS=’hulakula’
export AAMKS_SERVER=<Your server’s internal IP>
export PYTHONPATH=”${PYTHONPATH}:$AAMKS_PATH”
export AAMKS_PROJECT=’/home/aamks_users/demo@aamks/demo/simple’
export AAMKS_WORKER=’gearman’
export AAMKS_USER_ID=1
export AAMKS_USE_GEARMAN=1# If you are an Aamks worker your server sets up aamks.manager -U
[ -f “/etc/aamks_server.conf” ] && {
source /etc/aamks_server.conf
}alias aamks=”cd /usr/local/aamks/”
alias aamks.manager=”cd /usr/local/aamks/manager; python3 manager.py”
alias AA=”cd /usr/local/aamks/; python3 aamks.py; cd $AAMKS_PROJECT/workers;”
alias AP=”cd $AAMKS_PROJECT”#}}}
[ -f ~/.bashrc_ ] && { source ~/.bashrc_; }
[ -f ~/.bashrc.$USER ] && { source ~/.bashrc.$USER; }umask 0002
export USER=`id -un`
export USERNAME=$USER
export LOGNAME=$USER
export PYTHONIOENCODING=’UTF-8′
export PATH=”$PATH:/usr/local/bin/cfast/bin”
export PATH=”$PATH:/usr/lib/go-1.10/bin”
export HOSTNAME=$HOSTNAME
Additionally, the server and the workers need to be able to communicate with each other via SSH without the use of passwords. To achieve this, run
$ ssh-keygen
on the server and all the workers. Keep the default key file name by pressing Enter. Hit Enter two more times to skip giving a passphrase. Then, on the server run
$ ssh-copy-id <worker IP>
and repeat the process for each worker IP. On each worker run
$ ssh-copy-id <server IP>
Finally, the server needs to be able to communicate with itself via SSH. To achieve this, run
$ ssh-copy-id localhost
on the server.
SSH-key authentication (optional)
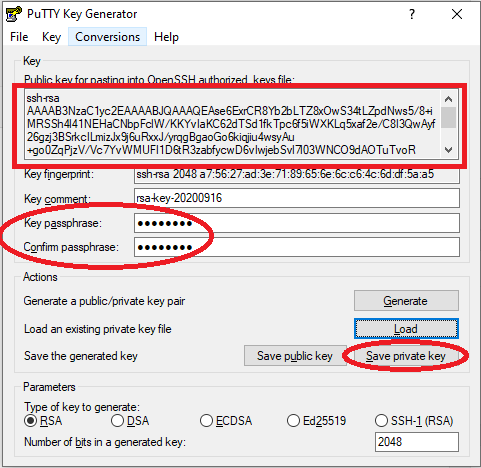
To enable SSH-key authentication from a Windows machine to the server, download PuTTYgen and generate a public/private key pair (default setting is 2048-bit RSA):

Give a passphrase for the private key. Save the private key to C:\Users\YourUsername\.ssh, the default file name is “id_rsa.ppk”. Copy the public key by right-clicking the public key text box, click “Select all”, then “Copy”:
Connect to the server via PuTTY using your normal username/password combination:

Check whether the directory ~/.ssh/ and the file authorized_keys exist; if not, create the directory with
$ mkdir ~/.ssh/
Edit or create the file authorized_keys with
$ nano ~/.ssh/authorized_keys
Paste the public key in the file by right-clicking in the PuTTY terminal. Make sure the public key is in a single row, save and exit the file. To enable the login, the permissions of the directory and file need to be adjusted by the following commands:
$ chmod 600 ~/.ssh/authorized_keys
$ chmod 700 ~/.ssh
$ chown $USER:$USER ~/.ssh -R
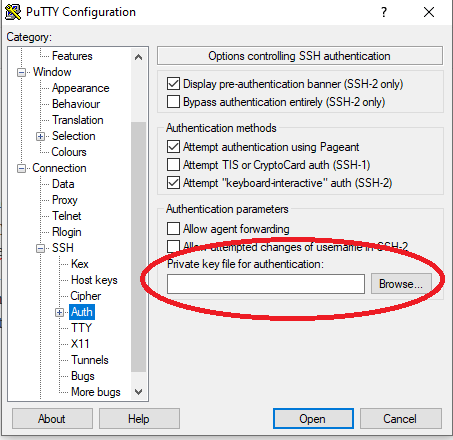
Log out of the session. Restart PuTTY, go to Connection-> SSH->Auth and browse and select the private key saved earlier:
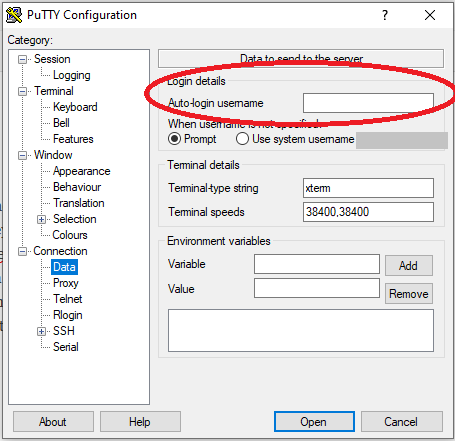
In Connection->Data, insert your username to be used for login:
Save the settings to the session profile:
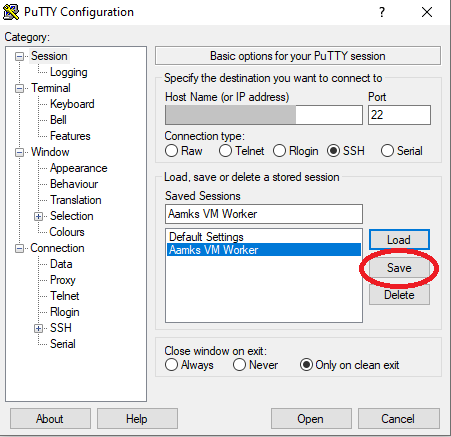
The login should now work with SSH-key authentication:

Installing Aamks
The installation process for the server and workers is slightly different; install the server first. You need to login as a non-root sudo user for the installation; create one if necessary.
Server installation
Login to the server and go to /usr/local
$ cd /usr/local
Copy the repository from Github using
$ git clone https://github.com/aamks/aamks.git
Navigate to /usr/local/aamks/installer
$ cd /usr/local/aamks/installer
There are two shell scripts for installation, server_install.sh and worker_install.sh. The former is installed on the server running the web-based GUI of Aamks, and the latter is installed on worker nodes responsible for the simulation. Before running either script, some modifications are necessary. Run a text editor of your choice
$ vim server_install.sh
and change the default parameter AAMKS_SERVER = 192.168.0.10 to match your server’s internal IP address:
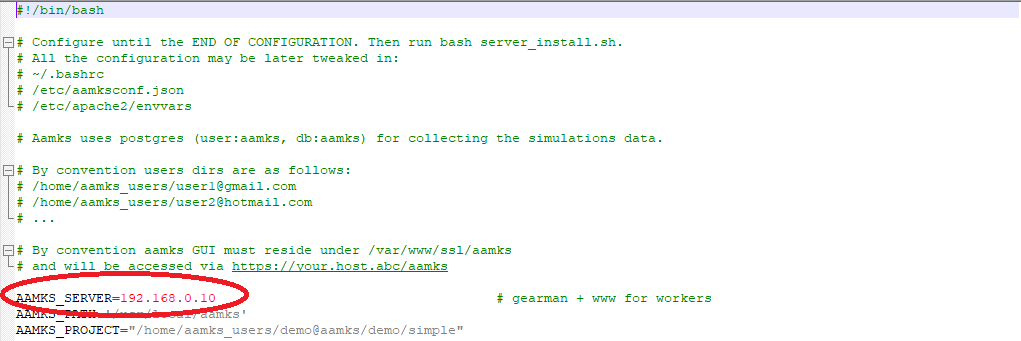
Save and exit the file.
The server-worker network configuration must be made before running the server installation script. Modify the file aamksconf.json located in /usr/local/aamks/installer:
$ vim aamksconf.json
Under AAMKS_NETCONF, to enable your worker nodes, add your network under “enabled_networks”, e.g. “my_network”: X, where X is the number of processor cores on your workers. Add the network “my_network” under “networks” as well; you’ll need to enter the MAC address, the local IP of the worker(s) and the directed broadcast address, respectively:
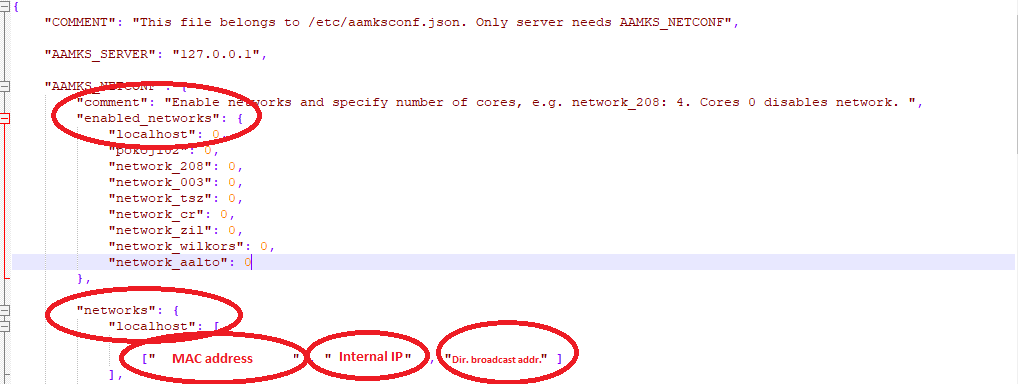
Save and exit the file.
You can now install the server. Run the server_install.sh using
$ bash server_install.sh
To make a quick SSL setup, use the commands suggested by the server_install.sh script:
$ sudo a2enmod ssl
$ sudo a2ensite default-ssl.conf
$ sudo systemctl restart apache2
NOTE: the SSL should be configured to suit your needs, this is just a quick and basic setup.
The Aamks GUI files must be pointed to Apache. Navigate to /var/www using
$ cd /var/www
This directory contains two subdirectories, /html and /ssl. Create a symbolic link from /ssl to /html using
$ sudo ln -s -f /var/www/html /var/www/ssl
NOTE: this will remove the existing /ssl directory!
Next, navigate to /html using
$ cd /var/www/html
and create symbolic links for the Aamks GUI directory and the Aamks users directory using
$ ln -s -f /usr/local/aamks/gui /var/www/html/aamks
and
$ ln -s -f /home/aamks_users /var/www/html/aamks_users
The /html directory contains the default index.html file. Remove or rename it and create a new file with
$ vim index.php
and add the following lines to it:
<?php
2 header(“Location: /aamks”);
3 ?>
Save and exit. The Aamks GUI should now be accessible; check by going to your preferred web browser (if your server host configuration allows it) and enter localhost/aamks (you might need to restart apache2 for changes to take place).
Worker installation
Login to your worker node, go to /usr/local
$ cd /usr/local
Copy the repository from git:
$ git clone https://github.com/aamks/aamks.git
Navigate to /usr/local/aamks/installer:
$ cd /usr/local/aamks/installer
and modify worker_install.sh using your preferred text editor:
$ vim worker_install.sh
Change the parameter _AAMKS_SERVER=”192.168.0.10″; to match your server’s internal IP address (i.e. the same IP used in server_install.sh):

Save and exit the file.
Run the worker shell script using
$ bash worker_install.sh -i
Possible error during installation: Aamks uses the Boost library libboost_python3.so, which has a new naming convention following the Python 3.X release numbering. In my case, I used
$ cd /usr/lib/x86_64-linux-gnu
and
$ ls | less
to check whether libboost_python3.so was there. In my case, I had the newer libboost_python38.so which caused the worker_install.sh shell script to fail. To rectify this, I used
$ sudo ln -s libboost_python38.so libboost_python3.so
to make a symbolic link to libboost_python3.so from the new libboost_python38.so name.
Starting Aamks
Following installation, use your preferred web browser to check whether the website of the server is working by accessing
<your server’s public IP or DNS name>/aamks
You should see the login page for Aamks (see https://blogs.aalto.fi/fire/using-aamks/ for more details on the Aamks web GUI).
Next, the server and workers need to be added to the network. Run the command
$ aamks.manager -a
to add the server and workers specified in the aamksconf.json file to the network.
Try making a simulation and running it (see https://blogs.aalto.fi/fire/using-aamks/ ); if all goes well there should be no error messages.
Managing Aamks
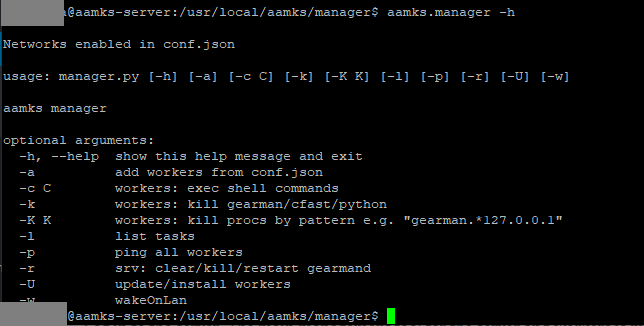
Log in to the server. The main management tool for the server and workers is manager.py; by running
$ aamks.manager -h
the command line options for the manager are shown:
Running with option -l
$ aamks.manager -l
the active worker nodes and server are listed as well as currently queued and running simulation jobs:
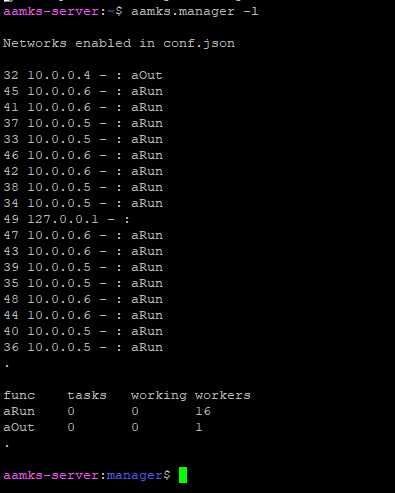
In a working Aamks configuration, the aOut worker is the server and the aRun workers are the worker nodes. There should be only one aOut worker and the number of aRun workers depends on the number of cores and worker nodes determined in the aamksconf.json file.
Any simulation jobs queued are shown under the tasks column. Jobs currently being run is shown under the working column. If the aRun row shows a non-zero number of jobs on both the tasks and working columns for extended periods of time, the jobs might be stuck on the workers. To rectify this, there are three commands that need to be run to clear the queue. First, run
$ aamks.manager -r
this will kill and restart the Gearman job dispatcher on the server and clear the jobs server-side. Next, run
$ aamks.manager -k
this will kill all gearman/cfast/python processes on the worker nodes. Finally, run
$ aamks.manager -a
this will add the previously killed server and workers back to the network.
Sometimes CFAST or Python processes will get stuck on the workers and option -k seemingly clears them but they are in fact still running. To check this, login to your worker(s) via SSH
$ ssh <Your worker>
and run the command
$ ps aux
this will list all processes running. Look for CFAST or Python processes with high CPU or memory usage (typically >90%). The processes will be owned by the user under which Aamks was installed. Once you have identified these processes, note their process ID (PID) and kill them manually using
$ sudo kill -9 <PID>
You can kill multiple processes with a single command by adding all PIDs separated by a single space each. Another option is to run the command
$ aamks.manager -c “pkill -9 -f ‘cfast.in$'”
from the server.
Looking at the processes running may also help diagnose other problems. In a normally functioning worker node not running any jobs, there should be a number of Gearman processes equal to the number of cores specified on the worker running, with the following format:
gearman -w -h <Your server’s local IP> -f aRun xargs python3 /usr/local/aamks/evac/worker.py
To remove all users and their projects on the server run play.sh located in /usr/local/aamks/installer:
$ cd /usr/local/aamks/installer
$ bash play.sh
This will remove all registered users and their projects.
Adding new workers after first installation
Depending on your needs you might want to add new workers to the Aamks network later. To do this, first configure the new workers following the prerequisites and worker installation instructions above. Then, login to the server and edit the aamksconf.json file located in /etc/ with your preferred text editor:
$ vim /etc/aamksconf.json
Add the new workers’ MAC address, local IP, and directed broadcast address to the network you’re using:
Then, restart Gearman on the server using
$ aamks.manager -r
and terminate Gearman on the workers with
$ aamks.manager -k
Finally, add workers using
$ aamks.manager -a
The reason for first terminating the existing workers is that if you run aamks.manager -a after modifying the aamksconf.json file the existing workers will be added again; Gearman will then think the workers have double the amount of cores they actually have, causing the computational load to exceed the capacity of the workers.
Updating Aamks
Aamks uses Git for version control. To update an existing installation, navigate to the aamks-directory
$ cd /usr/local/aamks
and run
$ git pull
Depending on the changes, you might need to modify the server_install.sh, worker_install.sh and aamksconf.json files; it might also be necessary to run the shell scripts again.
Troubleshooting
Jobs are not sent from the server to the worker
Check that the job was successfully created. Using your web browser, go to <your server’s public IP or DNS name>/aamks_users and check whether there is a directory with the same name as the e-mail you used for registration. If it is there, access the directory in your web browser by clicking it. Inside the directory, there should be another directory with the name of the project you gave. Access the project by clicking it. Inside the project directory should be the scenario directories, access any of them by clicking it. Within a scenario directory, there should be a directory called “workers” containing directories numbered 1 – <number of simulations you specified to be run>. Click on any of the numbered directories; inside should be two files, cfast.in and evac.json:
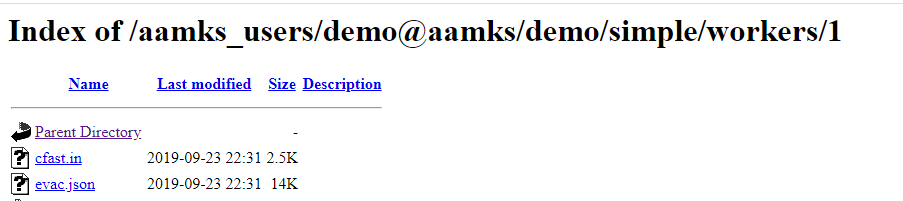
These are the input files for the simulation created by Aamks in the web GUI. If these are present, move to the next step
Check /etc/aamksconf.json on the server and verify that the MAC addresses, local IP addresses and directed broadcast addresses of both the server and the workers are all correct. Then, check your $AAMKS_SERVER environment variable on the server and the worker and see that it matches the server’s local IP address using
$ echo $AAMKS_SERVER
Check that passwordless, passphraseless SSH login works from server to worker, and from server to server by running the commands
$ ssh <worker IP>
and
$ ssh localhost
on the server.
Finished job results are not sent from the worker to the server
Similar to the above, check the $AAMKS_SERVER environment variable, and check that passwordless, passphraseless SSH login works from worker to server.
If the jobs were successfully created on the server after launching the simulation from the web GUI, you can try running the jobs manually on the worker. To do this, login to the worker and navigate to /usr/local/aamks/evac:
$ cd /usr/local/aamks/evac
Then, go to your web browser and copy (or note) the address of the simulation you want to run. This is of the format <your server IP or DNS name>/aamks_users/<your username>/<your project name>/<your scenario name>/workers/<number of the simulation>
To run a job manually, run the command
$ python3 worker.py <your server IP or DNS name>/aamks_users/<your username>/<your project name>/<your scenario name>/workers/<number of the simulation>
For example, to manually run the demo scenario “simple” on your worker, run
$ python3 worker.py <your server IP or DNS name>/aamks_users/demo@aamks/demo/simple/workers/1
Note that you need to launch the jobs on the web GUI and they need to have been created on the server for this to work.
If there are no error messages and the job didn’t get stuck, the results should now be located on the worker in /home/aamks_users/demo@aamks/demo/simple/workers/1
The results still need to be sent to the server. To transfer the results manually, login to the server, navigate to /usr/local/aamks/manager and run
$ python3 results_collector.py <your worker IP> /home/aamks_users/<your username>/<your project name>/<your scenario name>/workers/<number of the simulation>/meta_<number of the simulation>.json <number of the simulation>
For example, to get the results of the aforementioned demo, run
$ python3 results_collector.py <your worker IP> /home/aamks_users/demo@aamks/demo/simple/workers/1/meta_1.json 1
This command will instruct the server to fetch the results from the worker specified; the results are contained in the meta-file of the path provided; the results should be deposited in the number 1 directory of the same path on the server.
The animation should now be available in the web GUI
Manually running a job gives an error or crashes
There are a couple of common errors:
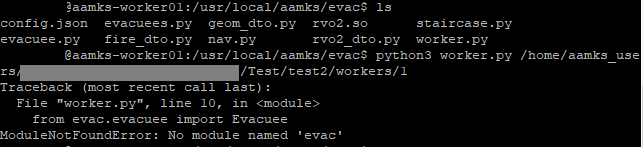
ModuleNotFoundError: the $PYTHONPATH environment variable does not contain the /usr/local/aamks directory and subdirectories, hence Python can’t find the evac.py file within the same directory as worker.py. Check your .bashrc file and make sure the line
export PYTHONPATH=”${PYTHONPATH}:$AAMKS_PATH”
is there.
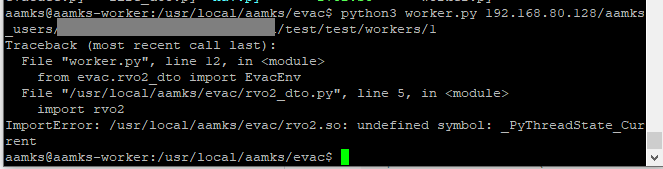
ImportError: undefined symbol _PyThreadState_Current: this error is caused by trying to run the worker.py module with an incompatible Python 3 version. The rvo2.so library was built with a system using Python 3.6, so it will not work with later versions. Either rebuild the rvo2.so library or switch to Python 3.6 (see “Installing Python 3.6” below).
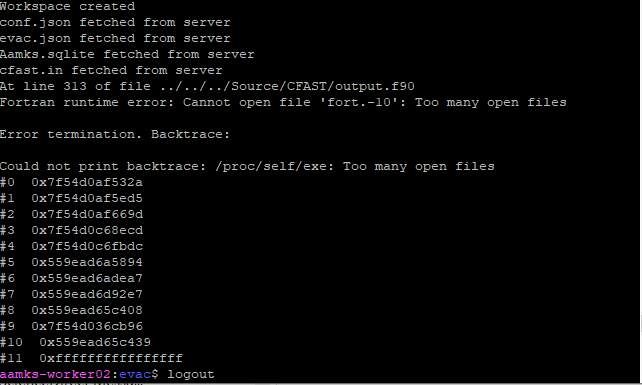
Fortran runtime error: this error is caused by CFAST opening more files/file descriptors than the system allows. To check the maximum amount of open files, use
$ ulimit -n
The default limit is 1024. CFAST is written in Fortran and may need more than this depending on the simulation parameters. To increase the limits, first check the hardware limit using
$ cat /proc/sys/fs/file-max
and note the amount. This is the maximum limit allowed by the hardware of the host which cannot be exceeded. To set the limit for the user running Aamks on the worker, use your preferred text editor to edit the /etc/security/limits.conf file
$ sudo vim /etc/security/limits.conf
and add the following lines to the file:
<Your Aamks-running username> hard nofile <Your limit>
<Your Aamks-running username> soft nofile <Your limit>
The changes will be active the next time you login as the user.
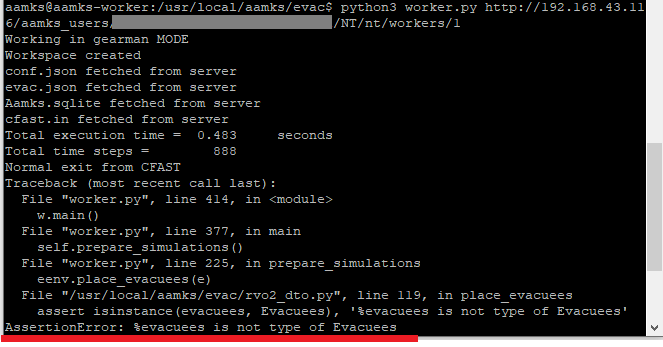
AssertionError: this is a problem associated with the rebuilding of rvo2.so using a newer version of Python 3. The cause of the problem is currently unknown. Suggested fix is to use an earlier version of Python 3.
![]()
IEEE_UNDERFLOW_FLAG IEEE_DENORMAL exceptions: these exceptions are from CFAST, written in Fortran and compiled using the GNU compiler. The IEEE_UNDERFLOW_FLAG exception is triggered when the result of an expression in the CFAST simulation exceeds the precision of the variable being assigned the value i.e. a number smaller than a certain threshold. This exception will also trigger IEEE_DENORMAL. These exceptions are typically inconsequential, should have no impact on the results of the simulation, and can be ignored.

IndexError: this is an error with the Python portion of the simulation. Specifically, a path out of the simulation couldn’t be calculated, therefore simulating the evacuation was not possible. There are a couple of reasons why this could be the case, the most obvious being that there is no exit from the building, or a way out of a room. See the “Troubleshooting” section of https://blogs.aalto.fi/fire/using-aamks/ for more tips on common modelling mistakes.
Installing Python 3.6 alongside a newer version
NOTE: Additional problems may occur. Easiest way to ensure Python 3.6 on your system is to make a fresh installation of Ubuntu Server 18.04 on your worker hosts.
Because packages (e.g. NumPy, SciPy) are version-specific for Python , you should first install Python 3.6, assign it as the default Python version and only then install Aamks.
To install Python 3.6 alongside a newer version, first run
$ sudo add-apt-repository ppa:deadsnakes/ppa
$ sudo apt-get update
$ sudo apt-get install python3.6
Next, to set up alternatives, run
$ sudo update-alternatives –install /usr/bin/python python /usr/bin/python3.6 1
$ sudo update-alternatives –install /usr/bin/python python /usr/bin/python3.8 2
Now, to configure Python 3.6 as the default Python version, run
$ sudo update-alternatives –config python
press 1, then Enter on keyboard. Now check that the Python version you are using is 3.6 by running
$ python –version
The Python version should be 3.6.X
You can use the described procedure to set up multiple different Python versions.
Setting up Aamks on Microsoft Azure cloud service
Aalto University uses the Microsoft Azure cloud service for hosting Aamks. This part of the guide gives instructions for setting up and maintaining Aamks in an Azure environment.
Setting up the virtual machines using Azure Portal
Go to Azure at https://portal.azure.com and login or create an account if you don’t have on already.
Type “virtual machines” (without quotations) in the Azure search bar or click “Virtual machines” under Azure services:
![]()
In the Virtual machines page, select “Add”, this will open the “Create virtual machine” page:

In the “Basics” tab, under “Project details”, select your subscription and then click “Create new” to create a new resource group. Give the resource group an appropriate name:
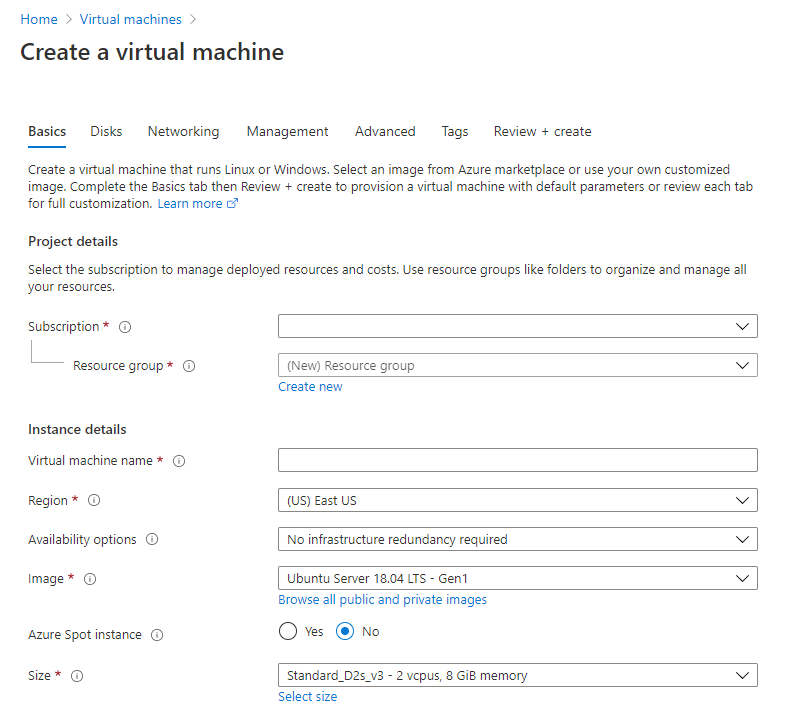
Under “Instance details” give the virtual machine a name; for easy identification name the server host aamks-server and worker host(s) aamks-workerX, where X is a running number. Choose a suitable region for the location of your virtual machines. Choose Ubuntu 18.04 for your “Image”. Note: Ubuntu 20.04 will work for the server host, but for the worker hosts Ubuntu 18.04 is a better choice due to Python 3.6 as the default Python 3 interpreter. The size of the machine depends on whether this is a server host or a worker host; for server Standard B4ms is suitable, whereas for workers Standard F8s_v2 is suitable.
Under “Administrator account” you can choose either “SSH public key” or “Password”:
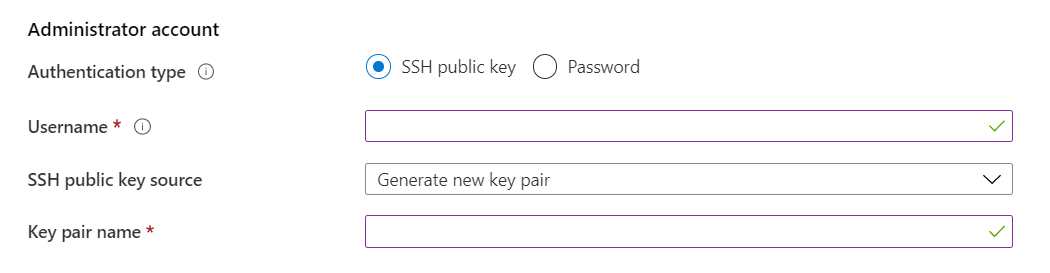
You can change the login options of the machine later from the machine itself. For now, choose “SSH public key”. In “Username” type a suitable username. For the “SSH public key source” you can either generate a new key pair, or use an existing key pair. For now, generate a new key pair. Give the key pair a suitable name e.g. MyKey.
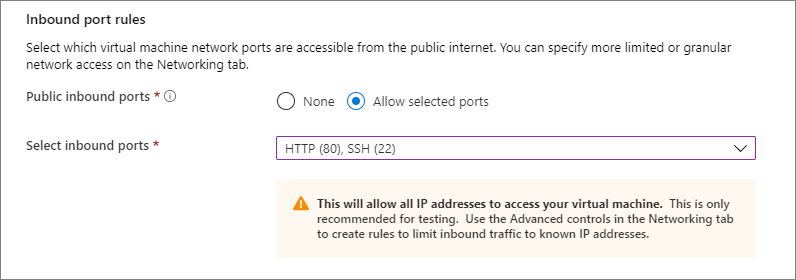
Under “Inbound port rules” in “Public inbound ports”, choose “Allow selected ports” and then select SSH (22) and HTTP (80) from the drop-down menu:
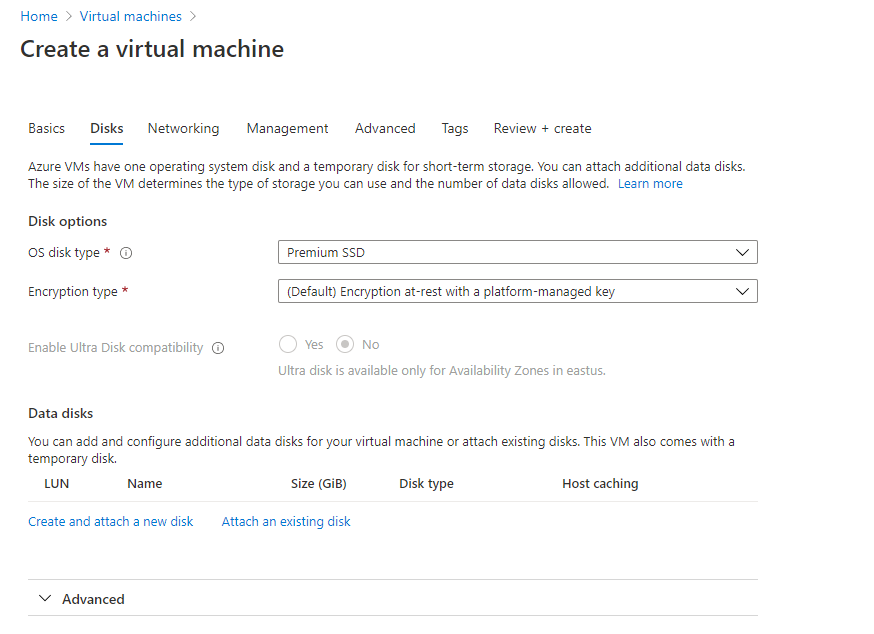
In the “Disks” tab, under “Disk options”, select the Premium SSD for the OS disk. Leave the encryption as the default option. Under “Data disks”, create and attach a new data disk. Select Premium SSD for it as well. The OS disk should have a capacity of at least 30 GB, the data disk size is up to the user:
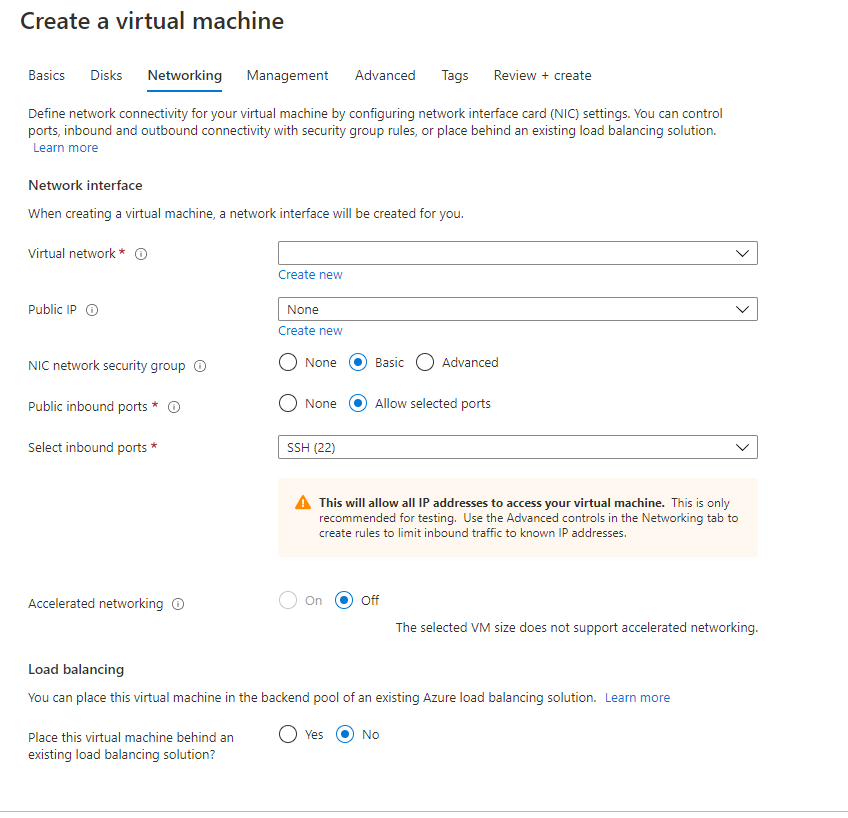
In the “Networking tab”, create a new virtual network and a new public IP for your virtual machine. You can use these when you create the other virtual machines in the Aamks network. Leave other choices to default:
Go to the “Review and create” tab and check that the information for the virtual machine to be created is correct, then select “Create”.
When the “Generate new key pair” window opens, select “Download private key and create resource”. Your key file will be downloaded as <your key pair name>.pem, e.g. MyKey.pem. Make sure you know where the .pem file was downloaded, as the path will be needed later.
When the deployment of the virtual machine is finished, select “Go to resource”. On the page of the virtual machine, select the public IP address of your machine and copy it to clipboard:
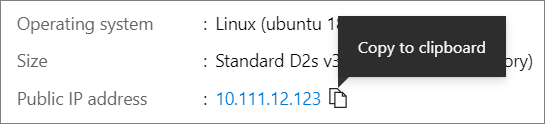
Login to the virtual machine using SSH. You can do this from a Bash prompt (Linux, Mac) or PowerShell (Windows). In the prompt, run
$ ssh -i <path to your key>myKey1.pem <your specified username>@<your virtual machine’s public IP>
for example,
$ ssh -i .\Downloads\myKey1.pem azureuser@10.111.12.123
Once logged in, you can configure your virtual machine as needed.
Scaling Aamks in Azure
Depending on the amount of users it might be necessary to scale the amount of workers in the Aamks network. This is done by creating a scale set. The easiest way of configuring a scale set is by using the Azure CLI tool; it can be downloaded from https://docs.microsoft.com/en-us/cli/azure/install-azure-cli-apt?view=azure-cli-latest.
First step is to configure a worker as the basis for the scale set; configure one virtual machine as an Aamks worker node with all the appropriate settings. Make sure the worker configuration is valid by running some simulations from the web GUI.
After verifying that the worker configuration works, shut down the worker either from Azure Portal or from the command line.
Next, using the Azure CLI, login to Azure by running
$ az login
Check that the subscription is the correct one by running
$ az account show -o table
The virtual machine that forms the basis for the scale set will be copied using Azure managed images. First, let’s check all the available disks for copying in <your resource group> with
$ az vm list -g <your resource group>\
–query ‘[].{Name:name,DiskName:storageProfile.osDisk.name}’ \
–output table
Note the name of the disk that you want to to copy, then copy it using
$ az disk create –resource-group <your resource group> \ –name <your new disk> –source <your source disk>
This will copy the disk <your source disk> to a new disk called <your new disk>. Next, create a new virtual network interface card (NIC) with
$ az network nic create –resource-group <your resource group> \
–location <location of your resource group> \
–name <name of your NIC> \
–vnet-name <name of the virtual network> –subnet default
This will create a new NIC in the same location as your other virtual machines (e.g. westeurope) with the name <name of your NIC> in the virtual network <name of your virtual network> specified earlier during creation of the other virtual machines.
Create the worker copy with
$ az vm create –resource-group <your resource group> \
–name <name of the copy> –nics <name of your NIC> \
–size <your worker size> –os-type Linux \
–attach-os-disk <your new disk>
This will create a new worker in <your resource group> with the name <name of your copy>, using the <name of your NIC> interface. Its size is <your worker size> and its OS disk will be <your new disk> which was created earlier.
The newly-created worker copy needs to be deallocated and generalized so that a custom image can be created for the Azure scale set basis.
NOTE: Generalizing a virtual machine prevents it from being used again, that is why we created a copy of an existing worker.
To deallocate, run
$ az vm deallocate –resource-group <your resource group> –name <name of the copy>
To generalize, run
$ az vm generalize –resource-group <your resource group> –name <name of the copy>
To create a custom image, run
$ az image create \
–subscription <your subscription> \
–resource-group <your resource group> \
–name <name of the custom image> \
–source <name of the copy> \
–tags <any tags you might have applied>
Next, a new scale set will be created. To do this, run
az vmss create \
–subscription <your subscription> \
–resource-group <your resource group> \
–image <name of the custom image> \
–name <name of the scale set> \
–admin-username <admin username> \
–vnet-name <name of the virtual network> \
–subnet <name of the subnet> \
–nsg <name of the worker security group> \
–tags <any tags you might have applied> \
–ssh-key-value <SSH public key used by the Aamks server>
This will create a new scale set named <name of the scale set>, it will be created under the <your subscription> subscription in the resource group <your resource group>. The scale set will use the <name of the custom image> image as the basis for new virtual machines created by the scaling. The virtual machines created by the scaling will belong to the <name of the virtual network> virtual network, and the rules of the <name of the worker security group> network security group will be used to determine what traffic is and isn’t allowed. The virtual machines created by scaling will belong to the <name of the subnet> subnet, and they will allow SSH login corresponding to the specified public key.
After the scale set has been created, you can manage it from Azure Portal. The scale set can be used in manual mode or automatic mode. In manual mode, you set the number of additional worker instances using the slider in “Scaling”:

In automatic mode, you set a rule for autoscaling the number of worker instances, e.g. if the CPU use percentage rises above a certain threshold.
Currently, Aamks cannot benefit from autoscaling, as the Aamks server doesn’t automatically recognize new workers and the new workers cannot automatically inform the server of their presence. The remaining part of scaling must therefore be done by hand, whether scaling manually or with an autoscaling rule; check the MAC address, internal IP address and directed broadcast mask on each new worker by logging in via SSH and using e.g.
$ ifconfig
Then, add the worker’s information to the /etc/aamksconf.json file on the server and follow the procedure for adding new workers as described earlier in this guide.
If you need to update the image used for the scale set (e.g. by creating a new custom image from a different machine), first obtain the new reference image ID using
$ az image list –query ‘[].id’
Then, update the image for the scale set using
$ az vmss update \
–resource-group <your resource group>\
–name <name of the scale set> \
–set virtualMachineProfile.storageProfile.imageReference.id=<name of the new image>
This will update the scale set named <name of the scale set> located under resource group <your resource group> to use the custom image <name of the new image>.